How to Create Open Concept Floor Plans Using Powerful 3D Tech?
Create your perfect home designs in 3D
Try it in your virtual home
Be sure your furniture is perfect before getting things real
Whether large or small, designing open concept floor plans can be difficult. Learn how to balance distinction and connection between each zone, and how to create an efficient layout for clients with an intuitive 3D floor planner.
Open concept floor plans dominate most modern layouts today, which is not surprising considering the advantages they offer. A unified space appears brighter and more spacious. It’s also easier to multitask, like prepping dinner while watching the kids or entertaining guests. But as convenient as open concepts are, decorating them can be particularly challenging. Luckily, 3D floor planners can help you determine the best way to arrange and design the space. Whether you’re a budding designer, an established pro, or a homeowner with a creative eye, a comprehensive 3D rendering can provide clarity and accuracy when developing floor plans. Easy drag-and-drop tech allows you to piece together an inclusive plan with all the elements needed, from paint colors to light fixtures to furniture, and more. Explore expert tips below on how to maintain a cohesive layout, and how to use a 3D floor planner to accomplish open concept floor plans that your clients will love.

How to Create an Open Concept Floor Plan Using a 3D Floor Planner?
Create a flawless design for a specific room or an entire property with a 3D floor planner. Using realistic products and materials, you can illustrate designs and gain clearer insights when drawing floor plans to see what’s best for the property and client. Here’s how to create high-quality 3D renderings for an open concept floor plan.
Create an Open Concept Floor Plan in 3 steps
1 Create a 2D Floor Plan
Start by drawing, uploading, or using a template to create an overview of the open concept floor plan in 2D. Digital tools in the floor planner make this a quick and simple process. Draw the location of the walls and each doorway and window.
Then connect the various components together and edit the measurements so they are correct. Make sure that the sizing and dimensions reflect the precise measurements of the property to keep the outline to scale.
Other parts of the layout can be included and displayed in the 2D blueprint using available icons and labels.
2 Choose Features to Create a Design
When the 2D blueprint is complete, you can change it to a 3D rendition. Then it’s just a matter of finding the resources you need to begin building a stunning design that will impress your clients.
Refer to the floor planner’s online catalog to choose from hundreds of different brand names and generic products or materials. Click and drag anything into your virtual model floor plan to develop a design.
Play around with diverse paint colors, wallpaper, cabinetry, tiling, or rugs to portray your creative vision, and figure out what fits or should be prioritized.
3 Print HD Images and Communicate Your Vision to Others
A detailed 3D model that illustrates design concepts is an invaluable tool to have for communicating ideas and plans with others.
A direct link to the project will allow collaborators to view the floor plan with an in-depth, 4K virtual tour so they can provide input. Any aspect of the design can be changed immediately without any lag between clients and contractors, which helps keeps projects on time and on budget.
Save HD panoramic images or get prints of the floor plan for future use.

How to Decorate an Open Concept Floor Plan?
Not sure how to decorate an open concept floor plan? In an open setting, certain factors like form, function, and scale, must be considered carefully when making decisions about the layout and design. Below, we break down a few essentials to focus on for developing seamless open concepts.
Define Zones and Prioritize Them
Start by clearly defining where each zone will be situated in the floor plan. Then, aim to prioritize each zone based on the client’s lifestyle. If they spend a lot of time cooking, reserve more space for the kitchen than the living room. If lounging and entertaining are bigger priorities, then scale back the kitchen to maximize these zones instead.
Use Furniture to Create Walkways and Separate Zones
Succeeding with an open concept design is all about balancing the flow and openness, with just enough separation to maintain a cozy atmosphere. Place furniture strategically so it creates direct walkways between zones and directs foot traffic. Use the couch as a barrier between the living and dining rooms. A breakfast bar, hutch, or rug can also be very effective for adding distinction between zones. Don’t forget to create a focal point for each zone as well.
Unify Space with Coordinated Decor and Color Scheme
While maintaining some distinction between each zone is important, it’s equally crucial to have features that connect them. For a cohesive design, stick with a neutral tone as the primary color scheme. Then, use accenting decor or colors to unify the zones and enhance visual interest. This could entail brass lighting fixtures, patterned pillows, or a bold hue peppered throughout.

Open Concept Kitchen Living Room Floor Plans
From U-shapes to L-shapes to peninsulas – there are many different types of kitchen designs that can work for small and larger open concepts. Choosing a thoughtful layout based on the lifestyle of clients will help you nail a design that makes their time at home more enjoyable. Here are 3 options that work exceptionally well in open concept kitchen living room floor plans.
L-Shaped Kitchen for a Tiny Floor Plan
A contemporary, L-shaped kitchen can work just about anywhere, even in a micro-sized floor plan. When working with 150 square feet or less, consider a setup that forgoes a dining area and focuses solely on the kitchen and living room. An L-shaped kitchen is placed on the right side of the floor plan, encompassing the full length of the wall and partial front-facing wall. A single, large area rug will add cohesion between both zones. Meanwhile, the sofa or sectional is placed towards the back left corner and a slim entertainment unit is against the left side, front-facing wall. One or two small circular coffee tables can be placed close to the sofa to help loosely define this zone as well. This type of setup maximizes counter and floor space, while giving ample room to move around comfortably.
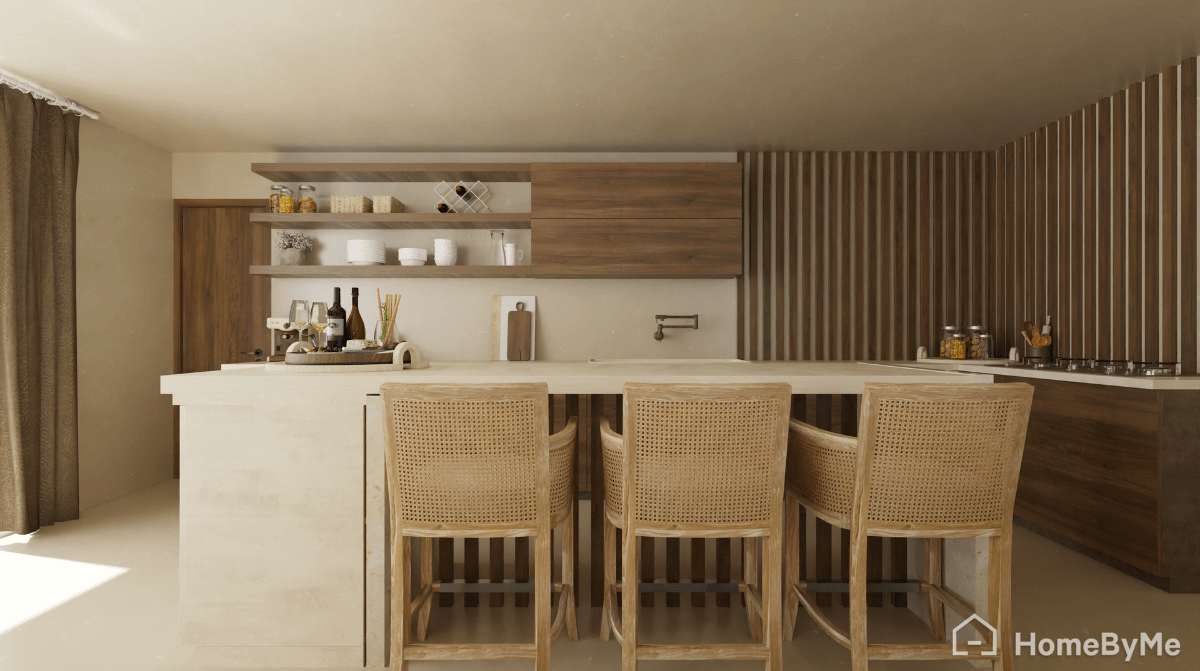
Single Wall Kitchen with Breakfast Bar
Single wall kitchens are widely used and favored for large open concept designs, and in smaller homes too. It places all the components of the kitchen – appliances and cabinetry – against one wall, leaving the rest of the space entirely open. Placing the kitchen against the farthest wall provides lots of room to play around with for the remaining space. Adding a small or sizeable breakfast bar in the center is an excellent way to link both zones while having a multi-purpose area for dining, cooking, or interacting with family and guests.
Peninsula Kitchen Layout
Want the benefits of a large kitchen island in a smaller layout? A peninsula kitchen is a fitting choice. It’s similar to an L-shaped design, except the counter and cupboards extend further out to create an island-style counter that’s attached rather than centrally positioned. This provides all the benefits of a separate kitchen island, with additional storage, counters, and dining space. A peninsula also makes it easier to add utilities and create more of a seamless look between the kitchen and living room.
Manage any challenges or hurdles for open concept floor plans with the help of an innovative 3D design planner like HomeByMe. Whether you’re remodeling a home, designing one from scratch, or creating a modern layout for an apartment, this free interior design software offers full control over design projects. With countless resources and materials available, creating professional, high-quality renderings has never been easier. Try it today and elevate your interior design game!


Make detailed floor plans with our 3D solution and create the perfect realistic 3D home.
Create your perfect home designs in 3D
Try it in your virtual home
Be sure your furniture is perfect before getting things real
Draw your House now!