House Plans: How to Make the Best Floor Plans

Create your perfect home designs in 3D
Try it in your virtual home
Be sure your furniture is perfect before getting things real
You don’t have to be a pro designer to create your perfect home. Our free 3D design planner lets you turn your dream design into reality with easy drag-and-drop tech that anyone can use.
Creating a thorough floor plan to design your dream home is a crucial task that requires careful thought and planning. After all, you want to ensure that the final design is something that will serve you and your family well for many years to come.
But how and where do you begin? And do you need to hire a professional designer to draft it out for you? By using our free HomeByMe 3D planner, you don’t have to rely on old-school methods or pay a hefty price for an architect or designer to figure out what your dream design actually looks like.
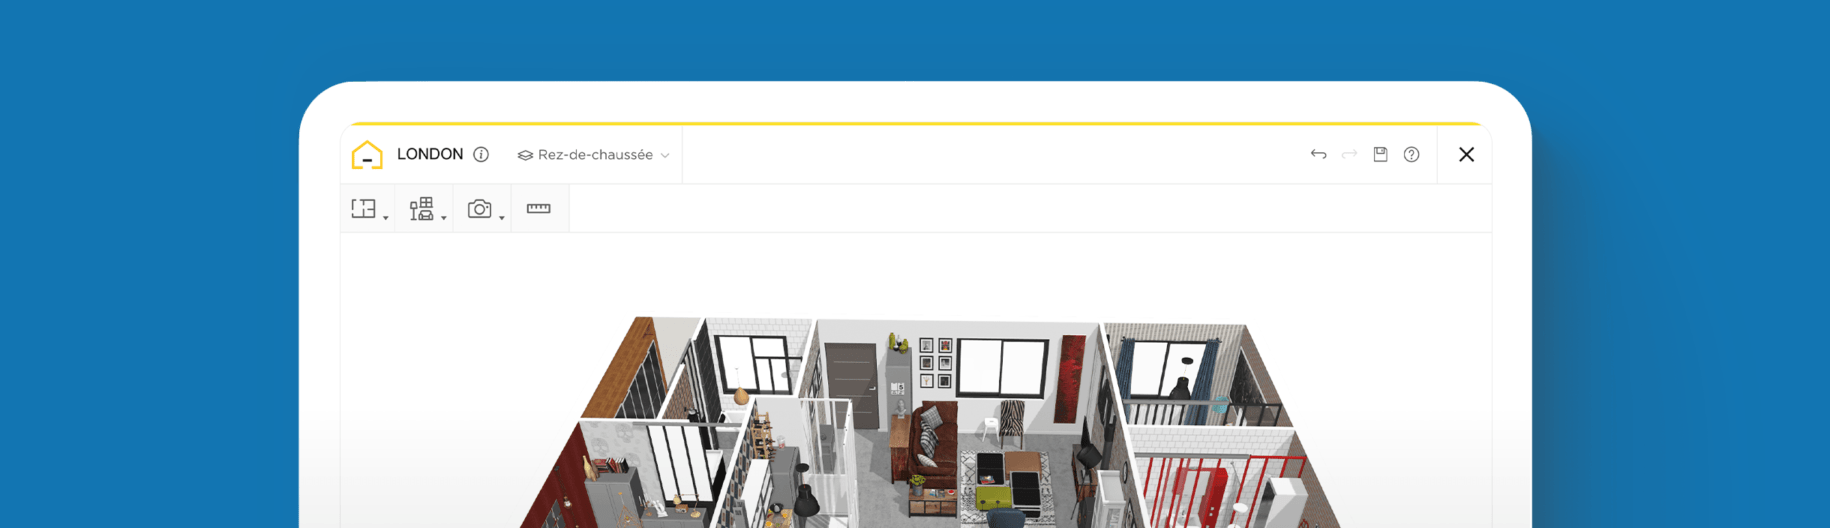
| HomeByMe is a free floor plan software that allows you to design your house in 2D, decorate in 3D, and visualize in full HD or 4K images. |
You can create a scaled, detailed, and accurate diagram of your entire floor plan all on your own, and from the comfort of your laptop. With a simple drag-and-drop interface, anyone can take the reins to construct and design their home with our Home Design Software.
Whether you’re tackling one room, large bedroom suites, or an entire 3-story house, you can outline specific dimensions, build walls and doorways, and determine how to maximize your natural light. You can also experiment and customize with a wide range of modern and classic décor features – all in a virtual format.
Discover how to use our HomeByMe 3D design planner so you can configure your house plans just as you envision.

How to Create Your House Floor Plans
House floor plans serve as your road map and blueprint for building out the design elements of your home. And, since homeowners tend to spend a significant amount of time at home, everything should be accurately tailored for your needs and wants.
For this reason, a 3D mock-up is a fundamental part of the process. It can help to ensure that your final space enhances your quality of life, is practical for your lifestyle, and can even benefit the resale value if you decide to relocate in the future.
Follow these key steps below to create your floor plans using our 3D design planner:
Take Measurements of Your Existing Structure
Every floor plan begins with having accurate measurements of the space you will be designing. Be sure to measure the layout, including walls, doors, windows, and utilities, first. We recommend starting at the perimeter and measuring exterior walls from corner to corner.
For interior walls, use your measuring tape along the baseboards for complete wall-to-wall dimensions. Then subtract the width of the baseboards. Measure to the nearest 1/16th to maintain accuracy.
Draw the Walls
Once you have your measurements ready, you’re all set to begin drawing the walls in your 3D planner. To do this, navigate to the toolbar at the top left corner. From here, click on the first drop-down and select “Walls”. A pen-like icon will appear, enabling you to draw each wall as needed.
As you move your cursor along, it will display measurements as you go. You can also use the measuring icon, located on the very right side of your toolbar, to ensure you are drawing the walls to scale.
Utilize the “Room” and “Separator” buttons to select specific shapes for certain areas and insert partitions that you may want to add between rooms. To adjust your angles and viewpoint, simply click and drag your cursor around. Or use the “Select Your View Mode” located at the bottom center of your planner to switch between 2D, 3D, or first-person viewpoint.
To build out a second or third floor, navigate above the toolbar and click the “First Floor” dropdown. Here, you can add another floor and design it accordingly.
Insert Architectural Elements
Once the foundation is complete, click the second icon in your toolbar and select “Build”. From here, you can insert the exterior doors, interior doors, windows, staircases, and technical equipment. You can even choose specific elements and designs based on what you like.
For example, if you’ve been thinking about adding a skylight roof window to increase the natural light in your bedroom or living room, click on “Roof Window” under the Windows menu. Use the sidebar on the left to filter your search and insert it to see whether it makes sense in your new home design.
Select Flooring
Finding the perfect flooring for your design is easier than you think. To explore our various flooring options, click on the second drop-down tab and select “Decorate”. Under the Flooring section, you will find a selection of interior options, including hardwood, carpet, and vinyl. Use the sidebar on the left to filter your options and play around with different materials and colors to determine what looks best.
Our flooring section also offers exterior flooring options. Among others, browse grass, brick, cobblestone, and decking. Adding exterior flooring helps to complete the look of your house or garage design.
Add Important Appliances
Don’t forget to include any essential modern conveniences in your house plans, such as a washing machine, dryer, dishwasher, and refrigerator. Simply navigate to the second button on the toolbar and click “Furnish”.
Under the Kitchen menu, click on “Appliances” to view and add what you need. Alongside kitchen essentials like refrigerators and dishwashers, you also find several types of small appliances, such as toasters and coffee makers. Including these adds an authentic, lived-in look to your design.
Looking to furnish the perfect laundry room? You will find washers and dryers in the Bathroom section.
Add Furnishings and Decorate
Next is the fun part – adding furnishings and decorating. We recommend choosing your furnishings first. Doing so allows you to get the room’s layout right before adding any decorative touches.
To begin furnishing a room, click on the “Furnish” tab. From here, select the room type you are furnishing. Among others, you can choose from the living room, bedroom, or kitchen. You can even find furnishings for outdoor spaces, from garages to pergolas.
Furnishing one room and something caught your eye for another? You can create your own collections by clicking the “Collections” tab. Here, you can add any furnishings you find and save them for later.
Once you’ve placed your furnishings where you want them, experiment with different color schemes or try out different wallpaper designs by clicking the “Decorate” tab and selecting “Paint & Wallpaper”. With thousands of colors and wallpapers to choose from, the hardest part may be picking your favorite!
To ensure an authentic look for your design, you can also add various accessories, such as lighting and plants, under “Decoration Accessories” to see what works best for your space.
Remember, nothing is final and the sky’s the limit—or, well, maybe your ceiling height. You can make as many modifications as you like during the design process. With so many options to test and compare, you can have fun trying out all of your ideas.

Small House Plans – Analyze the Flow
If you’re working with small house plans, every inch should serve a specific purpose. To get a realistic feel for each component that you add and create, navigate to the “View Mode” at the bottom center of your planner.
Click on the icons with two footprints (next to the 3D icon). This will take you right inside your virtual home. Use this vantage point frequently to analyze your design carefully so you can determine if it flows and makes sense.
A Frame House Plans – Maximize Your Space
A-frame house plans are captivating designs, but they can be quite limiting, which is why you’ll want to maximize your square footage – both inside and out. If you have an existing floor plan, upload it by navigating to the “First Floor” dropdown, located just above the toolbar.
Click the Upload an Existing Floor Plan button and start designing from there. Or use this tab when you want to add the upper level of you’re A-frame design with specific measurements and dimensions for the height.
To build your outdoor space – an essential part of many A-frames – click the first icon on your toolbar and select “Exterior” to start constructing your dream wraparound patio or porch.

Short on Time? – We Can Help
No matter how easy and fun to use the HomeByMe 3D design planner is, it’s time-consuming to design and plan a room or entire home. With so many daily obligations and time constraints, some people struggle to find the time to commit. Fortunately, HomeByMe offers a convenient floorplan drawing service.
Depending on your needs, we offer two cost-effective alternatives to hiring an architect or designer. We can create an unfurnished 3D project, allowing you to add your own furnishings and decorative touches. If you need help visualizing your interior layout, we can also create a basic, furnished 3D model.
To begin, simply fill out the form with your details and upload your floor plan. Within three working days, no matter where you are in the country, you’ll receive a friendly email from a team member letting you know your project is ready for viewing.
Whether you’re creating your home design from an existing structure or building it from the ground up, the HomeByMe 3D design planner gives you total control, even as a novice. Aside from the guarantee of being fun and simple to use, our innovative platform provides versatility and flexibility to discover new styles, craft your ideal room layouts and prioritize the flow to suit your lifestyle.
Once you’re done, you can save, print, and use it to get started on your real-life design. Try it for free today!


Create your floor plans and home designs easily with HomeByMe.
Create your perfect home designs in 3D
Try it in your virtual home
Be sure your furniture is perfect before getting things real
Draw your Floorplan now!