
Learn how to create a floor plan!
I recently went through my first family home purchase and the after process that is creating your nest. I believe the experience could have been enhanced greatly by the use of HomebyMe. In this series, I revisit the process as I would have done it had I known and used HomeByMe for all the decisions, perspective and planning that is part of making your house a home.
In this blog we’ll start at the beginning, that first moment your brain start formulating plans: The floor plan in the realtor packet.
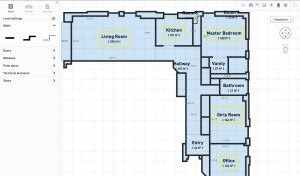
As you can see above, it is a 3 bedroom apartment with a large living room. The layout is an inverted L shape. The original condition of the apartment was poor to say the least. So we have to gut everything and get all new things! Yay! I did all the hard work of selecting the apartment and paying for it so lets all get our hands dirty with the next step. You click on the image above to download the floor plan image.
I actually tried building my home in 3D, I am a 3D modeler by trade, but the number of measurements I needed to produce an accurate representation is mind boggling! I spent a week with rulers, tape measures and notepads jotting everything down, but every time I started modeling I would need a new set of measurements! After I started using HomebyMe, I realized there is a better easier way to do it. I don’t have to be an expert in 3D or home construction, and neither do you! I had all the walls, doors and windows laid out in a few minutes! Let me show you!
Updated with the new release of HomebyMe, you can learn more about the release with this video.
You’ll notice I added a few bubble messages in the video on some of the best practices tips I use. All in all it took about 8 minutes to complete all the walls.
That’s amazing! It was taking me a week to do it in a professional 3D modeling application!
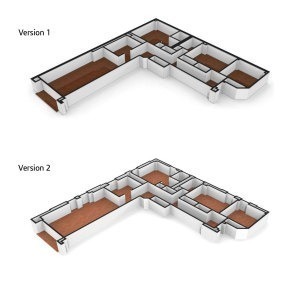
Since the release of the latest version of HomebyMe, I had some practice with the new tools and chose a new way to create the wall sections with variable thickness and windows. You can see in the image below that it produced a better overall result and it matches the floor plan much more accurately.
Next up I wanted to name all the sections of the home. I first used the “Floor separator tool” to add a few divisions on the open layout were no walls were intersecting. Then I named all the rooms in the field found in the center of each space.
Our next step is to put in all the doors, closet doors and windows. The doors are easy, but the windows do require some measurements so you can plan for your blinds and curtains. This is a great place to stop and try out building your own floor plan, or mine included in this blog.
Remember that you can also edit the wall heights, and you can creatively use floor separator to create some nice patio and faux outside areas for your home.
You can check out some great examples in the Project of the Month blog series.